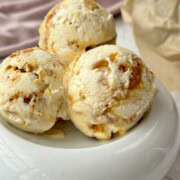
Homemade Honeycomb Ice Cream
If you thought making your own ice cream requires an ice cream machine, think again! This crunchy, creamy no-churn Homemade Honeycomb Ice Cream is so delicious and uses just 5 ingredients…
Servings: 6 servings
Ingredients
- 2 tbsp golden syrup
- 140 g caster sugar
- 1 tsp bicarbonate of soda
- 600 ml double cream
- 1 x 397g tin condensed milk
Instructions
- Line a 23cm square baking tin or baking tray with non-stick baking paper. This is for the honeycomb which will be very hot, so make sure it is on a surface that can handle heat in case of any spills.
- Next, take a large pan (the honeycomb mix will froth up a lot so choose a pan larger than you think) and add the golden syrup. Place over a gentle heat for about 1 minute - or until the syrup becomes very runny.
- Add the sugar and bring to the boil, swirling the pan to stop it from burning (don’t stir). Once boiling, continue to cook for 3 minutes, swirling often to prevent it from burning. Do time it and don't guess.
- Remove from the heat and shoot in the bicarbonate of soda. Stir quickly and confidently - you don’t want to overmix it but you do want it to be completely dissolved. Take care, it will really froth up.
- Pour into the prepared tin/onto the prepared baking sheet and leave for about 1 hour - or until set. Don’t touch it at all during this time as it will be VERY hot. See the tips for how to clean your pan immediately!
- Once the honeycomb has completely cooled, roughly chop into small-ish pieces.
- Next, line a 900g / 2lb loaf tin with cling film, ensuring you have enough overhanging the sides. Set aside.
- Pour the cream into a large mixing bowl and, using an electric whisk, whisk until you have soft peaks.
- Add the condensed milk and whisk again until thickened.
- Fold in the homemade honeycomb chunks until evenly distributed throughout.
- Pour into the prepared tin and smooth over the top using a spatula. Cover with cling film and freeze for at least 6 hours.
- Remove from the freezer 5 minutes before serving. Enjoy!
Notes
Scroll up for a step by step guide on how to make honeycomb ice cream.
To store: honeycomb ice cream keeps in the freezer in an airtight container for up to 2 months.
Be patient: you want to make sure you do gently boil the mixture for 3 minutes, I set a timer. If you don't cook it enough the honeycomb will be soft and chewy. If you have a thermometer you will want it to reach 150c
Top tip for cleaning! As soon as you've finished with the pan pop it in the sink and fill with hot water from the tap and washing up liquid and the honeycomb will come off very easily - don't leave it to sit and harden or you'll never get it off.
Cheat’s honeycomb: if you don’t have time to (or prefer not to) make your own honeycomb, some chopped up crunchie bars are delicious.
Chocolate dipped honeycomb: this honeycomb is great as a delicious snack or a homemade gift. I like to chop into chards, dip in dark chocolate and sprinkle with sea salt. So delicious.
Remove from the freezer before serving: it is important to remove the ice cream from the freezer a few minutes before serving to give it time to soften a little and make it easier to scoop.
Make it vegan-friendly: I haven't tested it myself but you could try using a vegan whippable cream and Carnation’s Vegan Condensed Milk.